How to Change Color Picker Shortcut Key Paint Tool Sai
Paint Tool SAI is a digital drawing tool from Japan. It is very light and popular among artists because of the simplicity and wide range of tools in Paint Tool SAI. Today's article is a basic tutorial on Paint Tool SAI, which promises to be useful for both beginners and those who want to learn more about the potential of the Paint Tool SAI. In addition, you will have the opportunity to learn more about all its control panels and tools, as well as how to modify the tools to suit your actual needs and some useful tips. Start finding out now!
About the Paint Tool SAI tool
- What is Paint Tool?
- The control panel in Paint Tool WRONG
- Familiarize yourself with the Color panel
- Tool panel
- Selection tools
- The Transform tool
- Drawing tools
- Layer control panel
What is Paint Tool?
WRONG or Easy Paint Tool SAI is a raster graphics editor and very light drawing software for Microsoft Windows, developed and published by Systemax Software. The software development began on August 2, 2004 and the first alpha version was released on October 13, 2006. The official release of SAI (1.0.0) is on February 25, 2006. 2008 and preview updates are released soon after. It is available from Microsoft Windows 98 to Windows 10.
This application is available officially in both Japanese and English. In addition, there are other unofficial user-created languages for this software.
The control panel in Paint Tool WRONG
In the FLASH Paint Tool, you have two main control panels to work on: Color and Tool on the right and Layer on the left. You can change their position in Window (W). Other control features are available through Quick Bar at the top.

The Step back feature can assist when you want to undo the previous action. You can use this step more than 10 times, so you won't have to worry when something goes wrong. Rotating canvas can help when you have to draw at some difficult angles. The Reset button returns the default view and rotation mode. Flip the frame gives you a new perspective on your work and also helps you find the wrong errors if any.
Familiarize yourself with the Color panel
All palette types can be accessed from the top bar of the Color and Tool panel or in Window (W). Now, consider each of these tools.
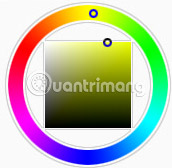
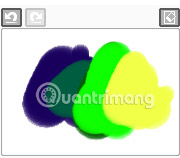
- Color Wheel is a set of colors placed around a circle, showing how colors are related to each other. Using this palette, you can easily work with key color combinations, additions and combinations to create other colors. This is your chance to learn more about color combinations in color theory. Inside this color wheel is an area containing different shades of each color.
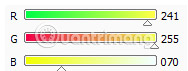
- RGB Slider allows you to manipulate colors on Color Wheel, change their colors and values.
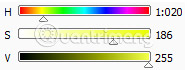
- HSV Slider stands for Hue, Saturation and Value (Hue, saturation and value). Moving the slider, you can change these properties of the color.
- Color Mixer in this program uses grayscale to change values, which can be very useful if you start drawing in gray first and then apply the main color.

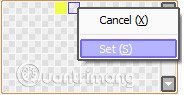
- Swatches is a place where you can save all your favorite colors. To do that, first make sure you have selected the desired color, then right-click on a color swatch and select Set. Then, this color will be saved in the Palette. Often people will save the most used colors and skin tones.
- Scratchpad is a place where you can combine any color without worrying, because it won't affect your main canvas. After you have achieved the desired result, you can apply this color on your work or clean Scratchpad and start over.
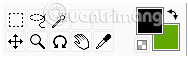
Tool panel
Selection tools
The first set of tools needs to be mentioned as Selection. There, you will have options: Lasso, Magic Wand, Move, Zoom, Rotate, Hand and Color Picker. Alternatively, you can change or convert Primary and Secondary colors on this control panel or make colors transparent.
The Transform tool
The Rectangle Selection tool also gives us all the conversion tools, such as Transform (Command-T) to expand and rotate.
Hint: Press Shift if you want to convert an area with the same scale.
There are also Scale and Rotate tools - they basically have Transform- like functions . The Free Distort tool allows you to perspective and change the scale of the selected area.
Below you can find Flip Horizontally, Flip Vertically, Rotate 90 0 CCW tools, Rotate 90 0 CW. They can also be accessed from Canvas (C).

Drawing tools
If you want your digital photos to have excellent results, you should definitely know about the Drawing Tools control panel .
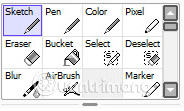
First of all, you need to remember that each Paint Tool SAI version may have a slightly different set of tools. For example, some versions have brushes and a few others have the Water Brush tool , but they basically have the same function, only different in name. So the Blur tool works just like Water Brush etc . You can change the settings and create an infinite number of drawing features with a simple brush. Try and see what you can do with it!
Alternatively, you can create hot keys for each tool by double clicking on the Tool icon or go to Others (O)> Keyboard Shortcuts .
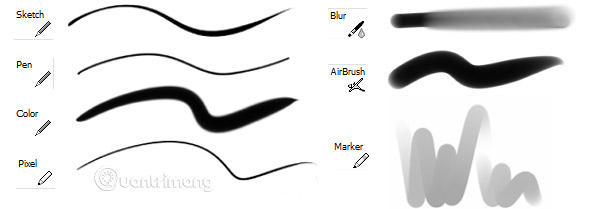
All tools can be customized according to your drawing needs, but you will find that each tool has its own strengths. For example, Sketch is useful for drawing basic lines, Pen allows you to draw beautiful, smoother straight lines and the Color tool is perfect for color blending - just like when you use realistic watercolor. sacrifice. Blur is also often used to blend colors, but the results of the Blur and Color tools are different. Choosing which tool depends on you and the Paint Tool SAI gives you a lot of choices.

Below the Tool panel , you can find the main settings for your Drawing tools, such as Edge Shape, Size, Min Size, Density and Texture , as well as some Advanced Settings for each tool. Familiarize yourself with these settings and experiment with them.

Edge Shape makes your drawing soft or hard, and can make your drawing more interesting. Using Size, you can make your brush very small to paint in detail or very large to use for color blocks and uniform color areas. Min Size is the amount of color that will fill the edges of the stroke. Density in this case controls the blur of the drawing tool.
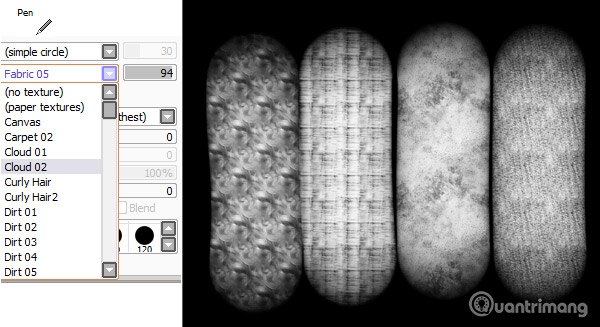
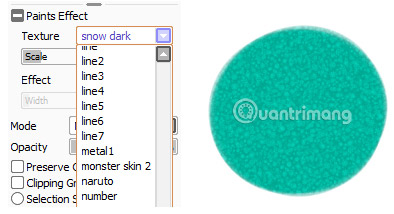
Besides, with each version of the Paint Tool SAI, there are some integrated patterns. They will add details to your work, making it more visually appealing. However, you can also create them yourself or download them, then add them to the Paint Tool SAI texture folder.
Back to the Blur tool - unlike the Color tool , it blends the original colors and changes them to completely different colors. Be careful with that, because sometimes abuse of this tool can affect the overall quality of your work, making colors look unclear and pale.

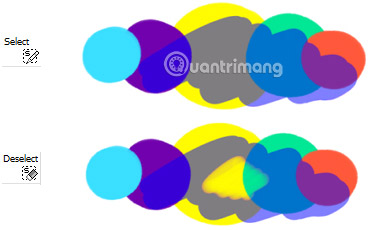
Select and Deselect are tools that work in a fairly simple way. Use them as a brush you often use in places you want to select or deselect. After making your selection, you can move to another layer and paint there, but you'll still work inside the selected area until you click Clear Selection on Quick Bar.
That's all there is to know about the Color and Tool dashboard! Hope you have found some helpful tips and better understand how tools work.
Layer control panel
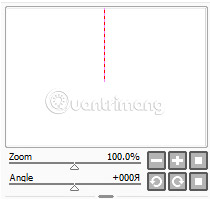
First is the Navigator Panel, the tool used for quick preview. The preview window is useful for quick navigation or a brief overview. It is a good habit to switch between a small piece of a work of art and an overall picture. The zoom feature and canvas rotation are controlled by moving the sliders or buttons.
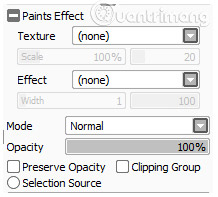
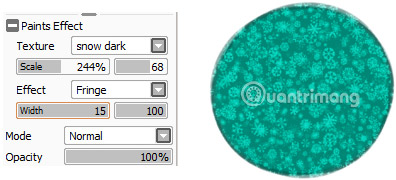
Next is the Paint Effects panel , including Texture and Effect. You will find Layer Mode and Opacity with useful layer tricks below. Consider them more closely.
In the Paint Tool SAI you can find a number of built-in motifs or create your own patterns. These patterns are applied to the entire layer and you can only add one texture to each layer. Besides, changing the proportions and opacity of textures can help you achieve different results. So again, don't be afraid to experiment.
Moreover, Fringe Effect (in some versions of the SAI Paint Tool called Wet Edges) makes your artwork feel like a watercolor painting! It is like a real drawing, even more interesting.
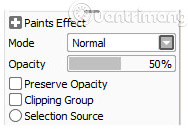
Now, learn the Layer Mode, which allows users to mix two or more layers together.
- Normal Mode allows you to overlay the underlying layer with a new layer at the top without mixing their colors together.
- Multiply, Shade and Screen modes are used to darken or brighten images. Screen has the opposite effect to Multiply. Use these layer modes for dark and bright areas on the image.
- Luminosity works almost like Screen mode , but adds even more brightness.
- The Overlay mode combines Multiply and Screen mode , so bright parts in this layer mode become brighter and darker parts become darker. Lumi & Shade works almost the same, although again this mode adds brightness.
- The simplest mode is Binary. All it can do is cover everything with black. But trying to change the opacity of the layer with Binary mode will change the color completely.

Inside the Mode section and Opacity you can find two interesting settings: Preserve Opacity and Clipping Group .
- The Preserve Opacity makes all the lines and fill of a layer locked, so you won't be able to get rid of its edges and can only draw inside the lines. It is useful when you want to change the color of the lines or change the color block without affecting colors and other areas.
- Clipping Group acts as a mask, and when you draw on the top layer (with Clipping Group turned on), your brush strokes will always be right inside the drawn area of the layer below.
Next is the Layer panel , where you can create new layers and groups, merge the contents of the layers together, delete layers, and also work with masks.
- New Layer creates a new layer as usual, while New Linework Layer opens vector tools for you. New Layer Set acts as a layer group, so when working, you can arrange your layers so that it doesn't mess things up.
- Transfer Down The basic layer will send the contents of this layer to the layer below it, and delete the entire top layer. Merge Down Layers combine the contents of the two layers together and delete the top layer.
- Clear Layer empties all its content, while Delete Layer simply removes it.

Hopefully, through this article, you know more about Paint Tool SAI. Again, if you don't feel comfortable working on this program, just spend more time practicing, and you'll see how easy it is. Experiment with settings, discover something new, and maybe you'll find a great creative idea with the Paint Tool WRONG.
Good luck!
See more:
- Karaoke software on quality computers
- This tool will help you edit photos online, completely free
- The most powerful photo editing tools on the iPad
How to Change Color Picker Shortcut Key Paint Tool Sai
Source: https://tipsmake.com/about-the-paint-tool-sai-tool